Customizing Virtel in V4.56
Virtel V4.56 introduces some enhancements to customization. With Virtel 4.56, customization is possible at an entry point level, effecting all transactions for that entry point, or a transaction level, effecting just one transaction. Previous customization was at an entry level only.
So what can be customized?
As delivered, Virtel contains several web elements which can be customized to turn on/off features, introduce bespoke JavaScript code and customize presentation formats using modified CSS rules. This newsletter discusses how to implement a customized Virtel and how to maintain those customizations across Virtel upgrades. The main elements which a customer might wish to customize are the “VWA settings”, customer JavaScript functions, Help files, print style sheets, and CSS elements. The “VWA settings” element, the w2hparm.js file, is now the root file for Entry Point customized components.
By default, w2hparm.js is retrieved from the directory allocated to the transaction XXX-03P. In the distributed version of Virtel this is W2H-03P and CLI-03P. Both of these transactions point to W2H-DIR and will load the w2hparm.js from that directory. If you wish to customize the settings and modify the default w2hparm you must change the “XXX-03P” transaction of your entry point to the custom directory. For example, to modify the “VWA Settings” for the default custom directory you would modify transaction CLI-03P to point to the CLI-DIR and upload the modified w2hparm.js to that directory. You can retrieve the default w2hparm.js file by entering the following URL:-
http://myCompanyVirtel:41001/w2h/sources.zip
Customization at the Global level
Customized components are now located in a Virtel “option” directory identified by the new pathname /option/. By default this pathname will point to the recommended customized directory CLI-DIR which is located in the HTMLTRSF VSAM file. The pathname /option/ associated with transaction XXX-03O is used to direct Virtel to the correct directory for the customized components.
By default, the “VWA settings” component w2hparm.js element is shipped in the SAMPTRSF VSAM files is used as the default settings by all entry points. It is referenced by the W2H-03P and CLI-03P transaction for the pathname “/w2h/w2hparm-js”.
The following shipped transactions are associated with the customization settings support.
Entry Point |
Transaction |
Prefix |
Default Directory |
|
|---|---|---|---|---|
CLIWHOST |
CLI-03P |
Defines pointer to w2hparm.js through path /w2h/w2hparm-js. |
W2H-DIR |
Requires customization to direct search to user directory. |
CLI-03CO |
Defines option directory using path /option/. |
CLI-DIR |
Directory containing customized components. |
|
WEB2HOST |
W2H-03P |
Defines pointer to w2hparm.js through path /w2h/w2hparm.js. |
W2H-DIR |
Requires customization to direct search to a user directory. |
W2H-03CO |
Defines option directory using path /option/. |
CLI-DIR |
Directory containing customized components. |
Table 1 – Virtel default transactions for customization
Any customized changes will be stored in the “customer directory” which by default is the CLI-DIR. The customized directory is associated with the HTMLTRSF VSAM file and as such will not be affected by a Virtel upgrade. Customers can setup their own customized directories but should ensure that they are associated with the HTMLTRSF file.
Default “VWA settings”
The default “VWA settings” shipped with Virtel in the W2H-DIR directory look like:-
var w2hparm = {
"settingsGUI":{"version":"v2"},
"font":"Droid Sans Mono",
"fontsize":"window",
"ctrl":"ENTER",
"enter":"Newline",
"home":"Home",
"end":"ErEof",
"shiftins":"Dup",
"shifthome":"FieldMark",
"shiftend":"End",
"ctrlins":"PA1",
"ctrldel":"PA2",
"ctrlend":"End",
"pgup":"PF7",
"pgdn":"PF8",
"pause":"CLEAR",
"style":"3270"};
The new keyword “global-settings” can be added to this file and will provide paths to customized components – Help, CSS, Print Style Sheets and JavaScript elements. Note the use of the /option/ pathname. This will direct Virtel to the correct directory containing the customized components.
"global-settings":{
      "pathToJsCustom":"../option/custJS.global.js",
      "pathToCssCustom": "../option/custCSS.global.css",
      "pathToHelp": "../option/myHelp.html"
      }
Adding the global-settings attribute to the “VWA settings” file w2hparms.js provides the pointers to the customized components located within the “option” directory as identified by the /option/ pathname. In the sample above customized CSS, Javascript and Help element pointers are defined.
When modifying the default w2hparm.js you must keep the customized version of w2hparm.js in the CLI-DIR directory. This will avoid it being overwritten during a Virtel release migration. Maintaining “customized” versions of w2hparm.js also requires that the transaction CLI-03P is modify to reflect that the customized w2hparm.js is now located in the CLI-DIR directory and not the default W2H-DIR. This means changing the transaction “Application field” from W2H-DIR to CLI-DIR.
The following w2hparm.js has been modified and uploaded to the CLI-DIR.
var w2hparm = {
"settingsGUI":{"version":"v2"},
"font":"Droid Sans Mono",
"fontsize":"window",
"ctrl":"ENTER",
"enter":"Newline",
"home":"Home",
"end":"ErEof",
"shiftins":"Dup",
"shifthome":"FieldMark",
"shiftend":"End",
"ctrlins":"PA1",
"ctrldel":"PA2",
"ctrlend":"End",
"pgup":"PF7",
"pgdn":"PF8",
"pause":"CLEAR",
"style":"3270",
"global-settings":{
      "pathToJsCustom":"../option/custJS.global.js",
      "pathToCssCustom":"../option/custCSS.global.css",
      "pathToHelp": "../option/myHelp.html"
   }
};
With these customized settings Virtel will look for customized JavaScript, CSS and HELP elements in the CLI-DIR sub-directory as identified by the /option/ pathname directory. These settings will apply to all transactions defined under the entry point whose VIRTEL transaction for the path “/w2h/w2hparm-js/” directs them to the customer VIRTEL directory, normally CLI-DIR. This can be overridden if the transaction has also a specific option. In this example the following customized elements have been uploaded to CLI-DIR:-
custJS.global.js
//CLI-DIR
//Add Print Button to Toolbar.
function after_standardInit() {
addtoolbarbutton(000,"../print.ico","Print Screen",do_print);
}
function do_print() {
window.print();
}
custCSS.global.css
/*
Customized CSS
Change RED to BLUE with background GREY for CSS class .NRED1
*/
.NRED1 {background-color: grey;
color: blue}
myHelp.html
Modified Virtel help.html template, created myHELP.html and uploaded to CLI-DIR. Changed Tile.
When logging onto an application under CLIWHOST the results of the customized elements are displayed:-
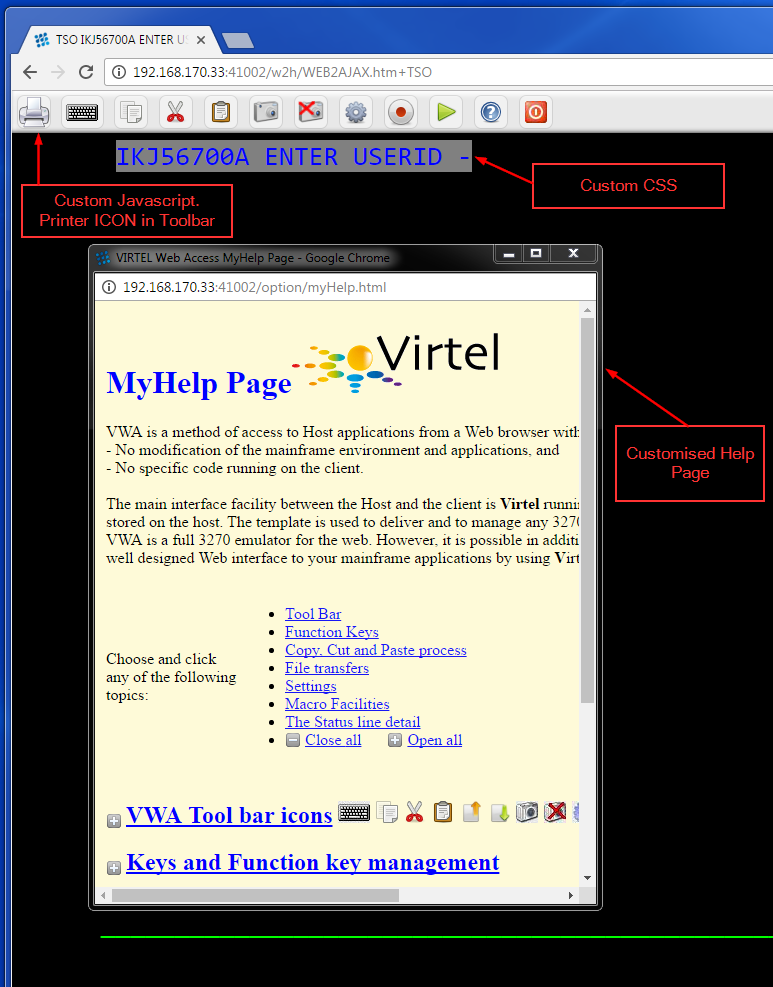
Figure 1 Customized Elements at a Global Line level.
Customizing at the transaction level.
Using the Option field with in the VIRTE VWA transaction definition we can specify an identifier that we be used to associate customized elements against a transaction. In the following definition we have specified “test” as our option identifier for this transaction.
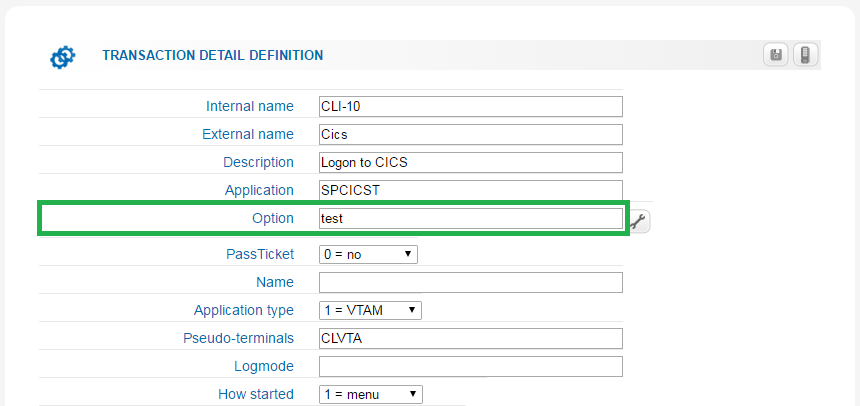
Figure - Transaction display with option field
Clicking the “tool” ICON to the right of the option field will the option dialogue panel. Here the css and JavaScript elements can be defined and validated. These elements will only be used when the CICS transaction is invoked. Note that the default names have been generated using the value from the option field. In this case the recommended element names are “../option/custCSS.test.css” and “../option/custJS.test.js”, however, the names are arbitrary and can be whatever the Virtel administrator considers appropriate for the customization:-
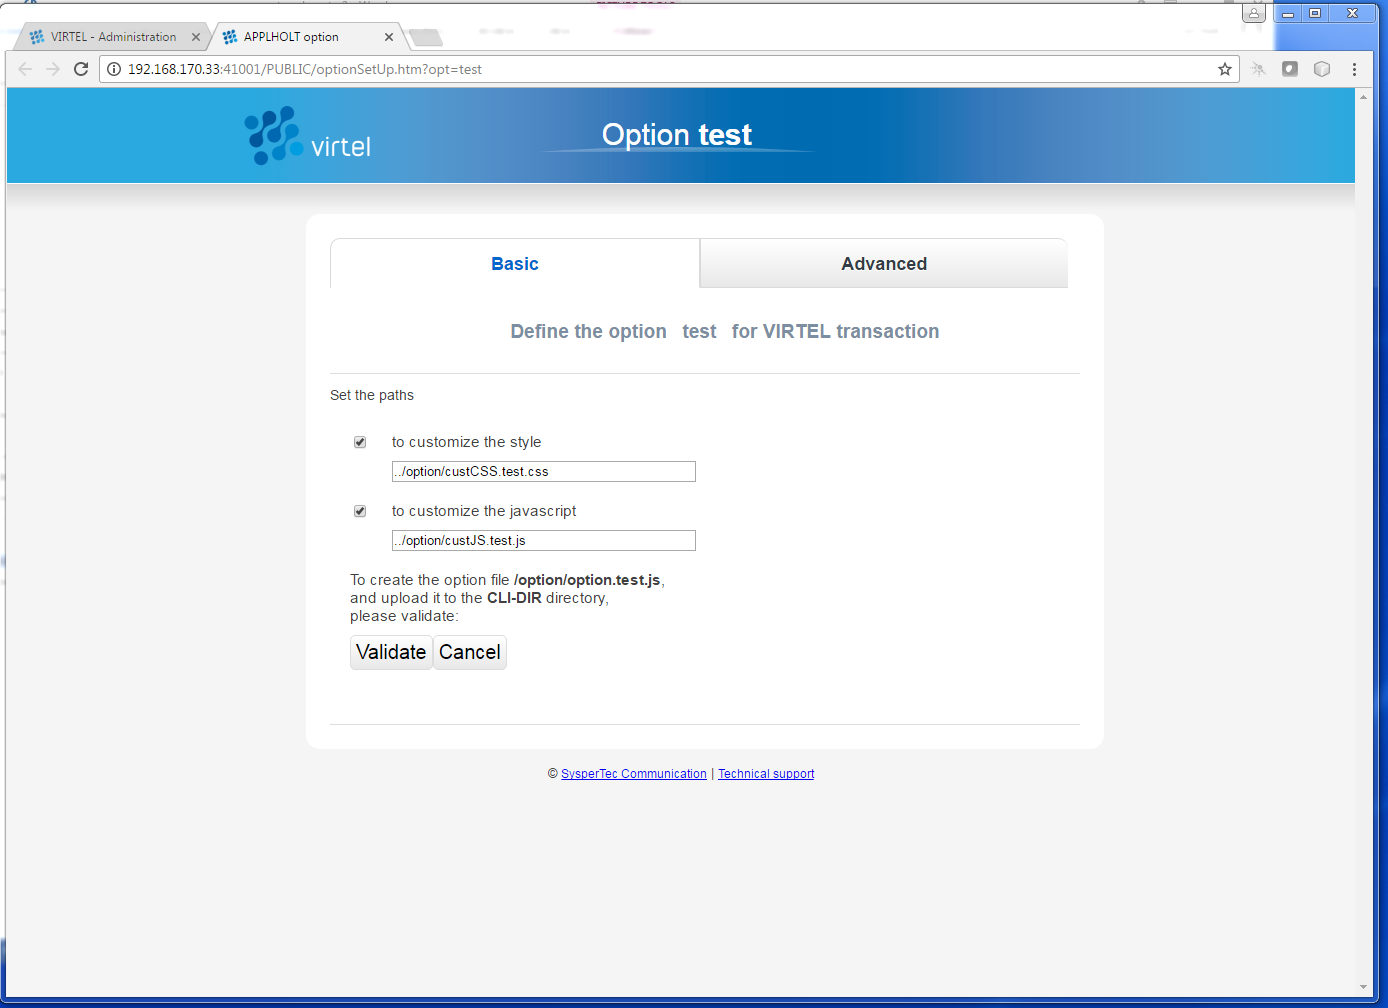
Figure - Options Panel in Basic mode
Select the correct checkboxes for the desired customization in cases where only one customization is required and also, in case where no customization is required, not even the “entry point” settings, untick all boxes.
Pressing the “Validate” button creates a stub option element called “option.test.js” and places it in the CLI-DIR directory. This stub element points to the customized JavaScript and CSS elements associated with the transaction. Having created the “stub” option element the associated JavaScript and CSS elements must be created and uploaded to the CLI directory. Here are the examples used:-
custJS.test.js
//CLI-DIR
/*
* User Javascript elements. Dummy entry
*/
custCSS.test.css
/*
Customized CSS
Set class NRED1 to default values for CICS transactions.
*/
.NRED1 {background-color: black;
color: red}
Changing the w2hParm options for a transaction
If it is required to change some of the w2hparm options at a transaction level a “pathToW2hparm” setting must be specified in the “option.xxx.js” stub file. See the example below which is a modified stub file:-
option.test.js
// customization for option=test
var oCustom={"pathToCssCustom":"../option/custCSS.test.css","pathToJsCustom":"../option/custJS.test.js"}
Selecting the “Basic tab” generates the stub element supporting the JavaScript and CSS components with the ““VWA settings” being taken from the /w2h/w2hparm-js/w2hparm.js member associated with the entry point.
The addition of other customized settings (“VWA settings”, print style sheet, help) must be manually added to the option.xxx.js file. To download the “option.xxx.js” file click the “Advanced” tab in the options dialogue. A download option will be available where the option stub file can be downloaded. Once downloaded, it can be modified to add the “pathToW2hparm” setting to point to a option element that can override the default w2hparm settings. By default this file should be called w2hparm.xxx.js. The following example demonstrates how to override the default “Enter” key operation from “Newline” to “Enter”.
w2hparm.test.js
//CLI-DIR
/*
* Override default w2hparm values
*/
w2hparm={
        "enter":"Enter"
};
In the following example, the CICS transaction has been associated with the “test” option using the follow option stub file:-
// customization for option=test
var oCustom={"pathToCssCustom":"../option/custCSS.test.css",
        "pathToJsCustom":"../option/custJS.test.js",
        "pathToHelp":"help.html",
        "pathToW2hparm":"../option/w2hparm.test.js"}
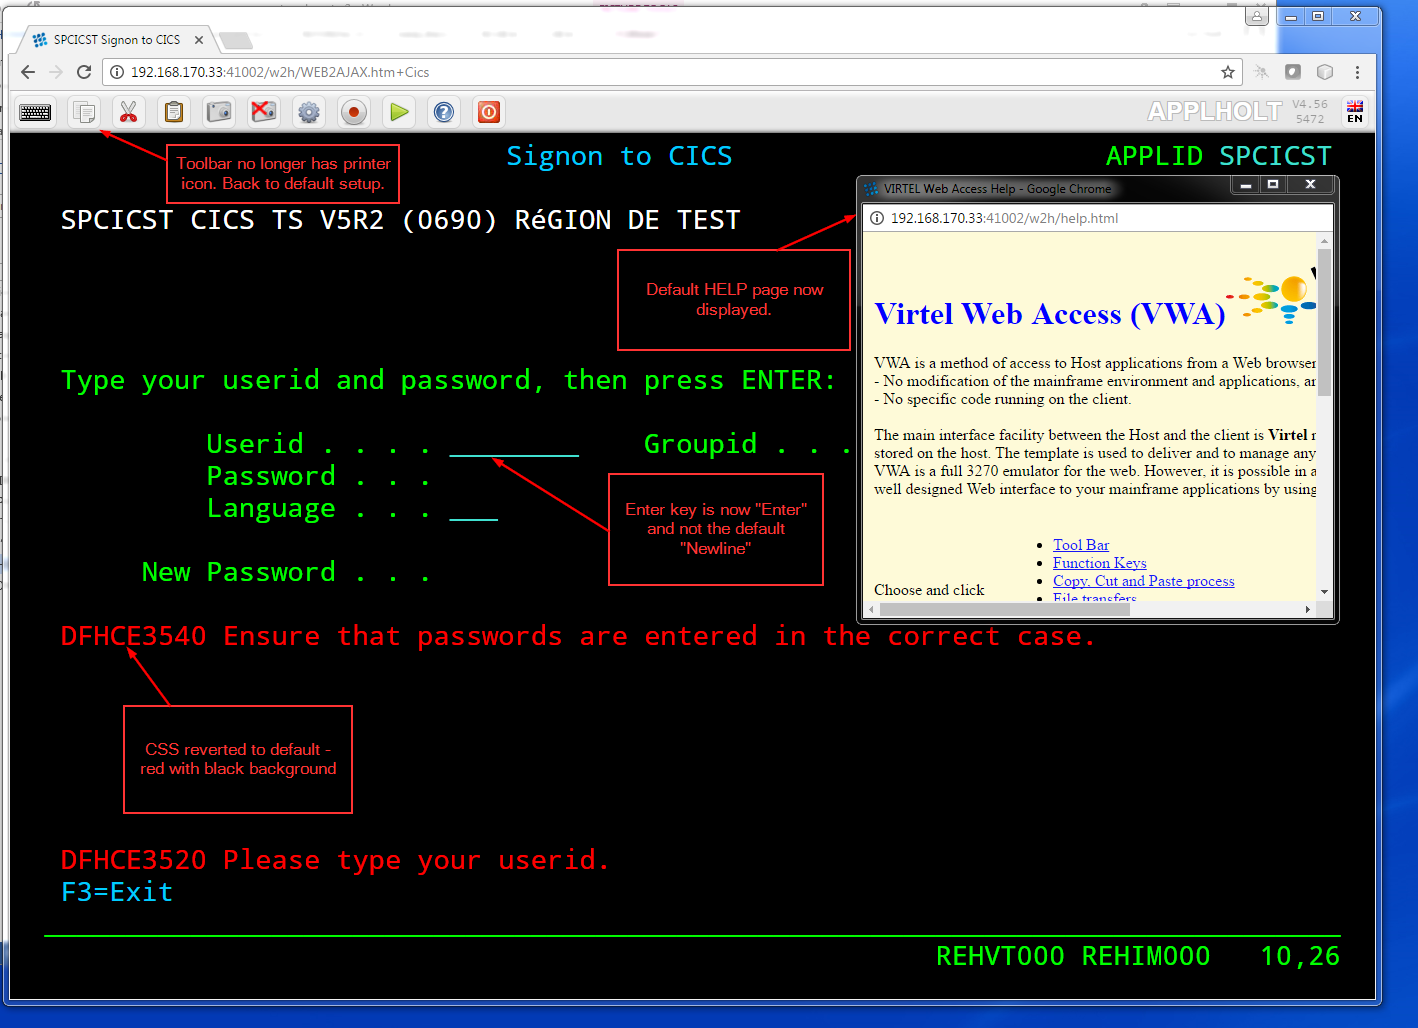
Figure - Implementing transaction customization
The results of using these customized elements for this transaction is that:-
The CSS rule has been modified to change the text to RED with a black background. This is the default setting for CSS class NRED1
The tool bar has been reverted to the default. The Printer ICON is no longer present.
The “Help” page defaults to the Virtel distributed “Help” template.
The “Enter” key has been given a value of “Enter”. The default is “Newline”.
Compatibility mode
To maintain compatibility with previous versions of Virtel a compatibility option is available. To force pre Virtel 4.56 behaviour specify the following parameter in the TCT. This is known as “compatibility mode”
HTSETn=(OPTION-DEFAULT-COMPATIBILITY) where n = 1-4.
If you only want certain transactions to behave in “compatibility mode” specify “compatibility” in the option field of the transaction. In compatibility mode customized elements are maintained in the CLI directory. For example, to maintain a customized css file in “compatibility mode” the following operations are necessary:-
Transaction CLI-03CC is modified to point to the CLI-DIR. The default was W2H-DIR.
A custom.css file is uploaded to the CLI-DIR. If the TCT HTSETn option has been set then this customized file will have “Global” presence and will affect all transactions.
An alternative to the TCT option is to define compatibility at the transaction level. If “compatibility” has been specified in the transaction “option” tag then only that transaction will be affected by the custom.css file. Other transactions will adhere to the new V4.56 behaviour.
Another alternative to the TCT option is to add/modify your existing w2hparm.js and place it in the custom VIRTEL directory, normally CLI-DIR. The following will provide the same behaviour as in previous versions of Virtel:-
var w2hparm = {
..., /* Existing settings, if any */
“"global-settings":{
      "pathToJsCustom":"../w2h/custom-js/custom.js",
      "pathToCssCustom":"../w2h/custom-css/custom.css",
      }
};
Customizing elements.
CSS (pathToCssCustom - key of oCustom)
This module effects the presentation of web pages. The VIRTEL administrator can customize the color settings for all applications or for specific applications. The custom settings are defined in a style sheet called custom.css which the administrator uploads to a VIRTEL directory designated for storage of customer files (usually CLI-DIR). For more information see Virtel Web Access User Guide, Chapter 1.12, Site Customization of Colors and Logo.
JavaScript (pathToJsCustom - key of oCustom)
To take into account site-specific JavaScript extensions for Web Access, the WEB2AJAX.htm page template loads a customized JavaScript file when a session is started. See Virtel Web Access User Guide, Chapter 1.13, Site Customization of JavaScript functions.
w2hparm (pathToW2hparm - key of oCustom)
The VIRTEL Web Access user can use the Settings menu to modify certain options such as font size, 3270 key mappings, and color schemes. The user’s settings are stored in a browser local storage which remains valid so long as cookies are not deleted from the workstation. The settings stored in the user’s local storage override any other settings for VIRTEL Web Access stored in a w2hparm.js file. See “Global modification of Web Access settings”, in the Virtel Web Access User Guide, chapter 1.7 for further details. The migration of w2hparm can come from several sources:- user local storage, transaction option, line option w2hparm.js (CLI or other), global option w2hparm.js (W2H).
print style sheet (pathToPrintCss - key of oCustom)
Customize the print style.
help page (pathToHelp - key of oCustom)
Customize the help page.
Note
For compatibility mode empty custom.js and custom.css files are delivered with Virtel along with the relevant transactions.
Custom directory CLI-DIR
It is strongly recommended that any customized elements are located in the CLI-DIR which is found in the HTMLTRSF file. Do not customize the W2H default modules in the W2H-DIR. These will be replaced during a migration of Virtel so any changes or updates will be lost.
Virtel Application menu
The Virtel application menu is a particular case of a template which depends on a VIRTEL transaction (“applist”) which might have an option field specified. For customized components applicably only to applications associated with the menu it is recommended that a specific option (e.g “appmenu”) is defined for this transaction. This will avoid JavaScript or CSS conflicts for applications not associated the Virtel application menu.