Customizing colours with CSS in Virtel 4.53
Virtel enables the customisation of colours through customized CSS rules. By default the style sheet used in 3270 presentations is WEB3270.CSS which is listed in Appendix A. Two methods are available to modify or introduce customized CSS rules. Both methods involve CSS and javascript elements. You should be familiar with these file types.
Method 1 – Using file custom.css
You can override some of the default styles by creating a style sheet called custom.css and placing it in the CLI directory. You will also need to ensure that the transaction to locate the custom.css points to the CLI directory. By default it will point to the W2H directory. The transaction is called CLI-03CC and can be found in the CLIWHOST entry point.
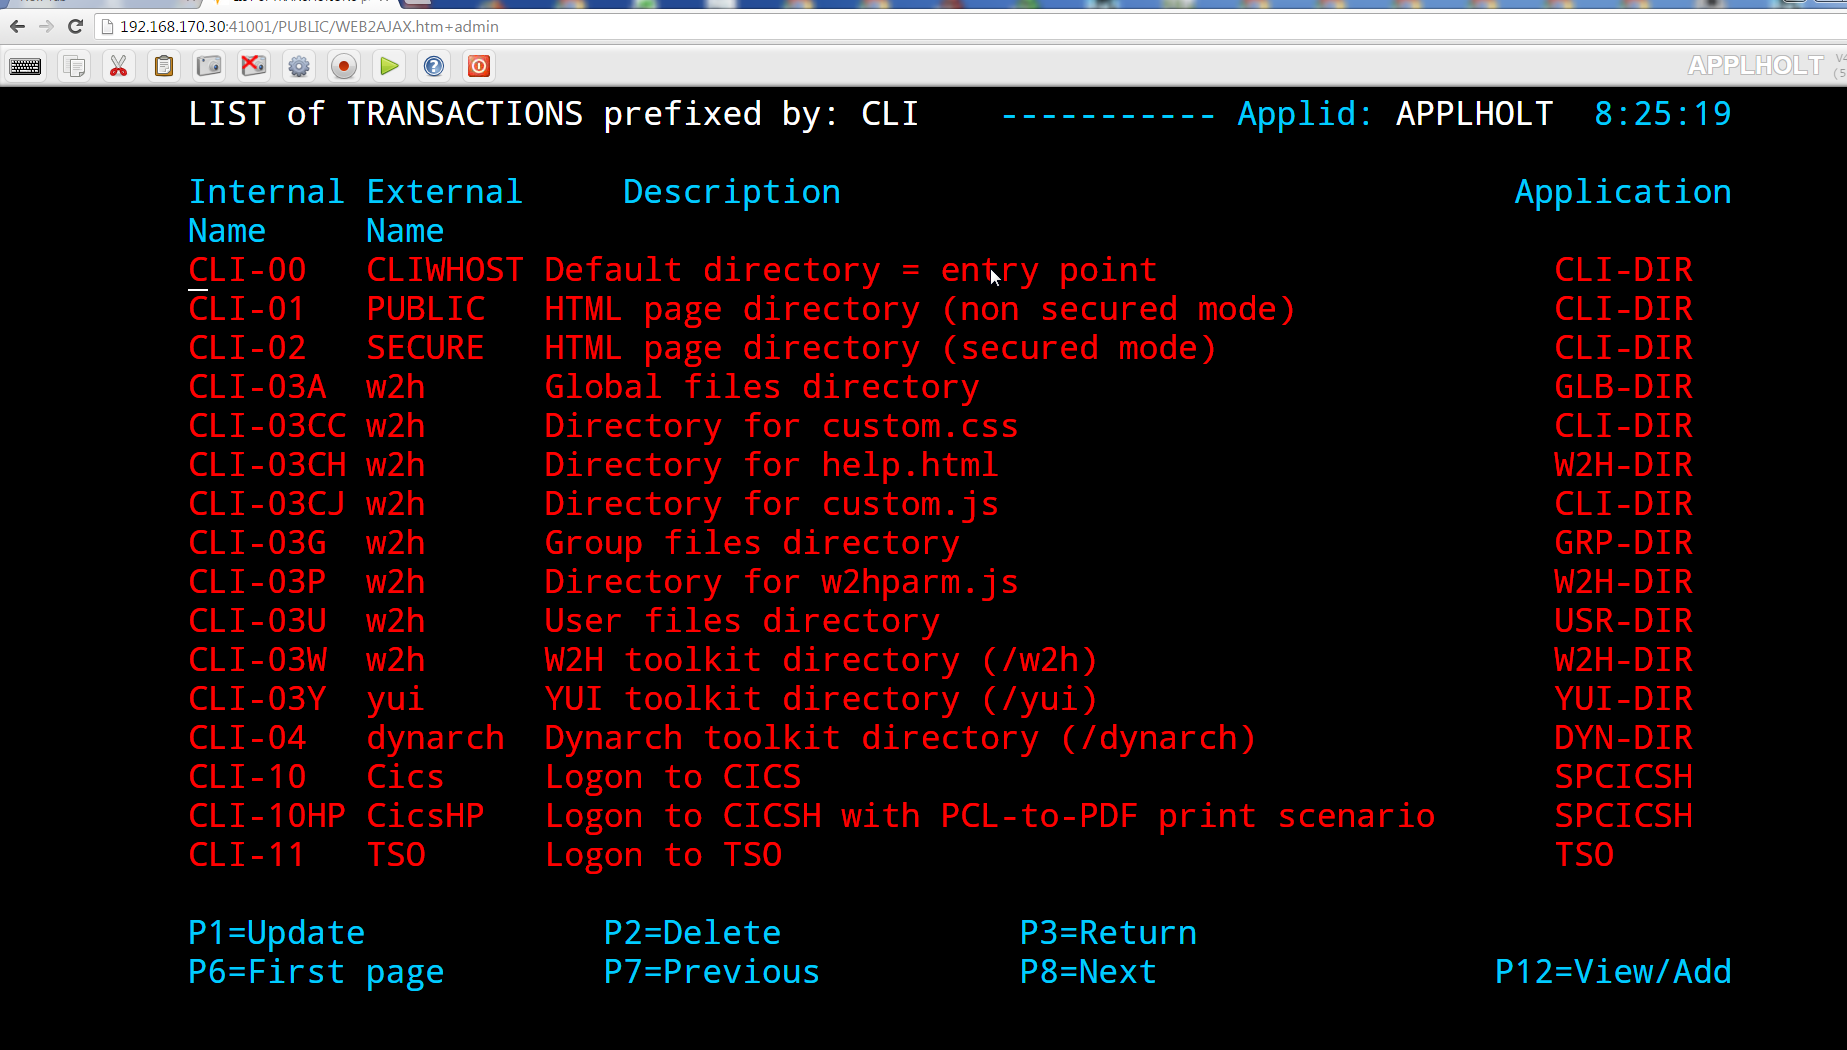
Figure CLIWHOST Transaction list
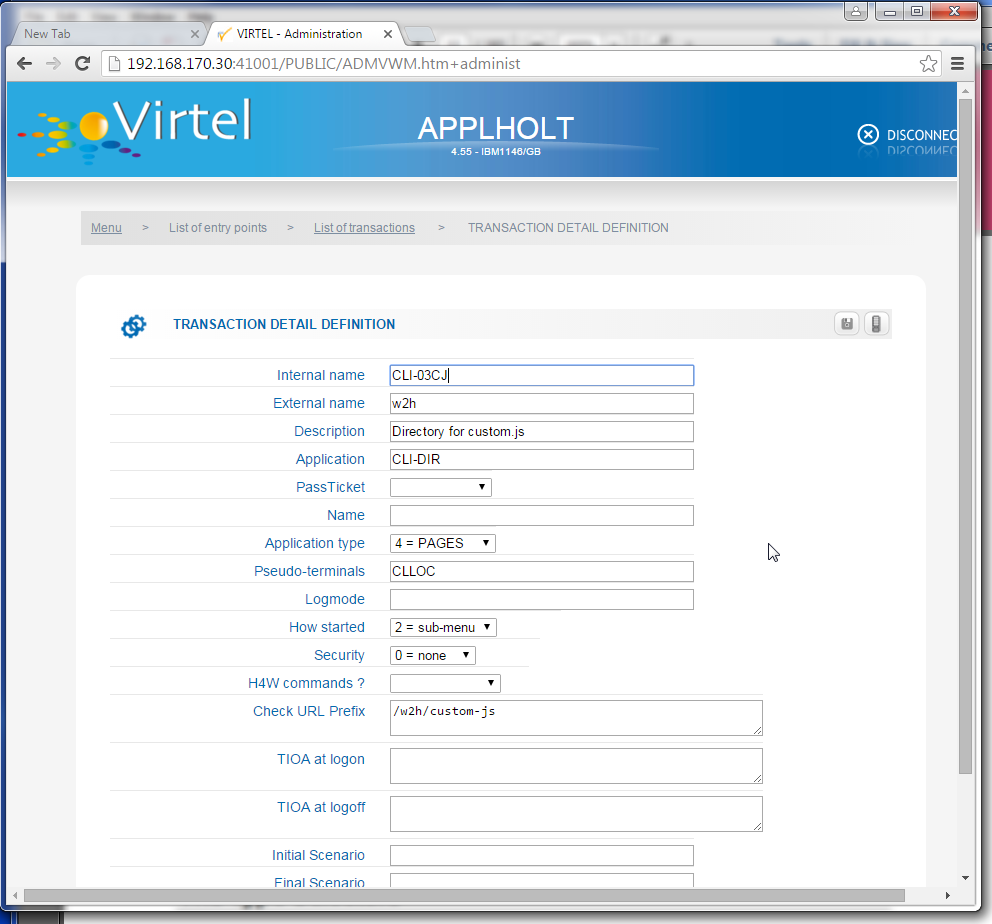
After modification the transaction the display should look like the following.
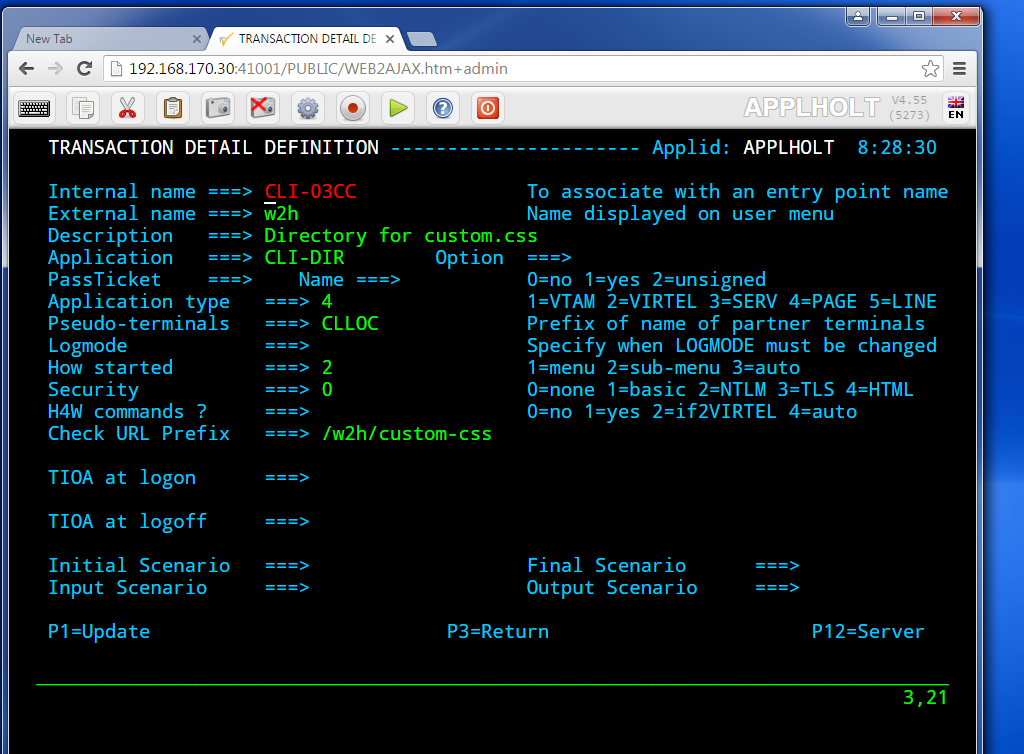
Notice now that the “Application” field points to the CLI-DIR and not the default W2H-DIR. After you have made these changes upload the CSS rules that you wish to customize. These will override the defaults in WEB3270.CSS. The customised CSS rules must be placed in the CLI-DIR.
For example to change the colour RED to GREEN code the following CSS rules in your custom.css file and upload it to the CLI-DIR directory:-
/*
* VIRTEL Web Access 3270 style sheet
* (c)Copyright SysperTec Communication 2010 All Rights Reserved
* $Id: //depot/virtel/htmltools/w2h/WEB3270.css#18 $
* Changes:-
* *RED -> GREEN
*/
.NRED {color: **green**;}
.SRED {color: **green**; border-bottom: solid 1px;}
.URED {color: **green**; text-decoration: underline;}
.RRED {background-color: **green**; color: #000000;}
.BRED {
color: green;
-webkit-animation: fieldblinker 1s steps(1,start) 0 infinite normal;
animation: fieldblinker 1s steps(1,start) 0 infinite normal;
}
.selection-box {
border:1px solid **green**;
background-color: rgba(128,0,255,0.1);
}
Notice that only the value property of the selector is change (: value) not the selector name itself (.NRED). That must remain as defined. Having uploaded the custom.css file to the CLI-DIR refresh the cache on the browser window (CTRL-R) to implement the CSS changes.
Method 2
Method 2 allows you to define multiple CSS rule files and have them selectable from the Web Access Settings panel (V2). A customised custom.js file is used to implement this feature. As with the custom.css file in method 1, a transaction entry in the CLIWHOST entry point will have to be modified to pick up the customised version of custom.js from the CLI-DIR directory and not from the default directory W2H-DIR. The transaction that must be modified is CLI-03CJ. Following the same procedure outlined in method 1 to change the directory for custom.js.
By default, the Web Access Settings has three selectable CSS files. These are displayed as 3270, Gray and White on the default Web Access Settings panel and are supported by the rules defined in the three related CSS files - WEB3270.CSS, WEBGRAY.CSS and WEBWHITE.CSS. These CSS files can be found in the sources.zip directory which can be downloaded from the W2H directory. Any one of these files can be used as a template or model for a customisable version or one of the other sample CSS files distributed in the source.zip file.
Create the custom.js file(s) that will be used to select the CSS defaults. These files(s) will be displayed in the Web Access Settings panel. See the example javascript below:-
//CLI-DIR
if (typeof w2hparm !=="undefined") {
   w2hparm.useVirtelMacros = true;
   w2hparm.synchronizeVirtelMacros = true;
   w2hparm.settingsGUI = {
      /*
       * Select which settings dialog version(s) will be accessible in the VWA toolbar.
       * Possible values are :
       * - "v1+v2" ...... Allow both settings dialogs (OLD and NEW)
       * - "v2" ......... Allow NEW settings dialog only
       * - otherwise ... Allow OLD settings dialog only
       */
       version : "v2"
    };
}

/*=====================================================================
*
* CUSTOM CODE SAMPLE TO ADD A CUSTOM CSS FILE
* OR TO REMOVE A DEFAULT CSS FILE
*
*====================================================================*/

/*
* This implementation adds 3 custom CSS to the settings "Display Style" list choice,
* and removes the "white" default choice from this list.
*/
function modify_settingsValues(name, values) {
   // The target is the "style" list settings
   if (name == "style") {
      // Remove the "white" default entry from the list of choices values.splice( values.indexOf('white'), 1);
      // Append 3 custom styles to the list of choices**
   return values.concat( "GREEN.CSS", "BLUE.CSS", "DEFAULT.CSS" );
   }
}

/*
* This block of code sets a specific label for each style added.
* If this code is omitted, the raw value of the entries are displayed instead.
*/

oVWAmsg.custom( {
   "style:GREEN.CSS" : "Custom"          // Use this label instead of 'GREEN.CSS'
 , "style:BLUE.CSS" : "Test"             // Use this label instead of 'BLUE.CSS'
 , "style:DEFAULT.CSS" : "Default"       // Use this label instead of 'RED.CSS'
});
In this javascript example were are adding three custom style CSS files, GREEN.CSS, BLUE.CSS and DEFAULT.CSS. These files are than associated with the labels “Custom”, “Test” and “default”. It will be these labels that will appear in the Web Access Settings.
After creating the javascript file custom.js and uploading it to CLI-DIR prepare the three CSS files by using a distributed model as a template. In this example, GREEN.CSS and BLUE.CSS will be based on the default model WEB3270.CSS. Create three files, GREEN.CSS, BLUE.CSS and DEFAULT.CSS and copy in WEB3270.CSS into each file. Modify the GREEN.CSS and BLUE.CSS files according to the rule changes you want to introduce. Leave the DEFAULT.CSS as is. Upload the three CSS files to the CLI-DIR directory.
To implement the changes open a TSO session on your CLI port, normally the 41002. Use the URL 192.168.170.32:41002/w2h/WEB2AJAX.htm+TSO or something similar. Refresh the browsers cache with CTRL-R.
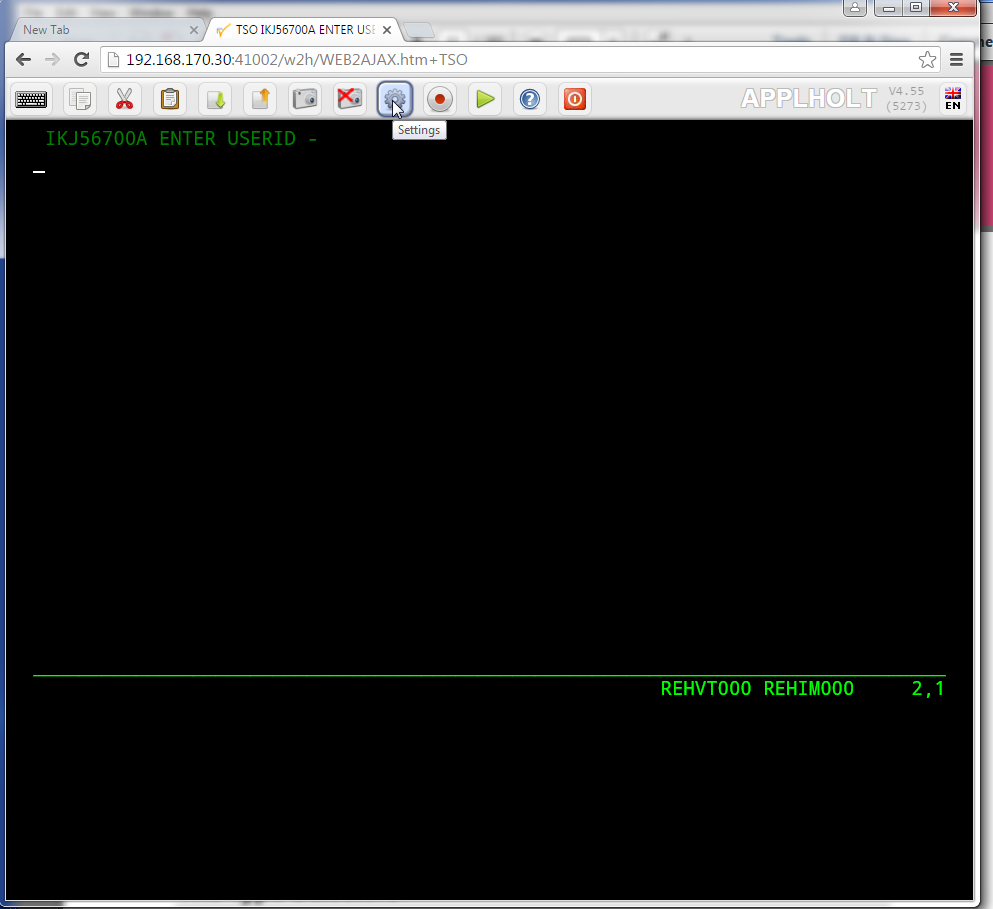
Click the settings ICON and the Web Access Settings panel should appear.
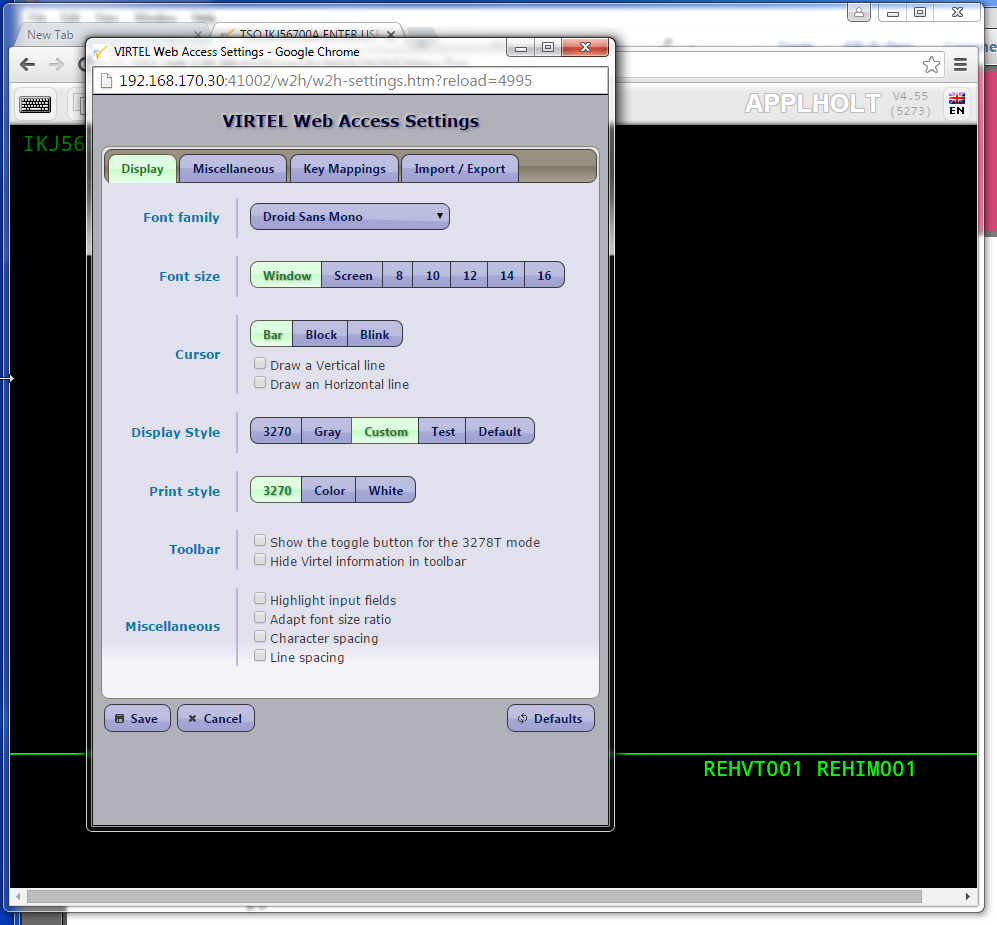
Now, under the Display tab you should in the Display Style list the labels that you assigned to the three CSS files that were created – Custom (GREEN.CSS), Test(BLUE.CSS) and Default(DEFAULT.CSS). Select the CSS display that you wish to use and “Save”. The settings window will close. To implement your selected display style you must now refresh your TSO browser window by pressing CTRL-R.
Shucks it doesn’t work…..
If when you open the settings panel you get the following display then you are picking up the default VIRTEL Web Access Settings panel. Note that the display style is “3270, Gray and White”
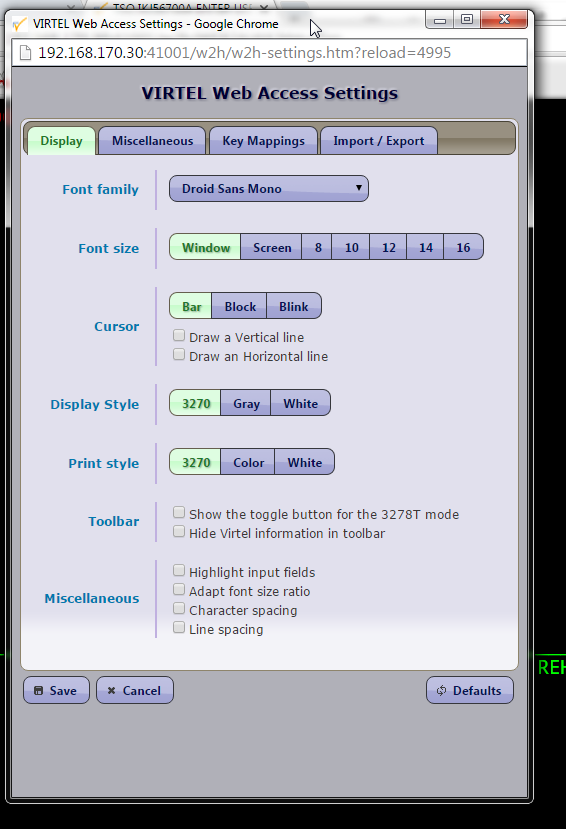
If this happens check that the port is the correct port, in this case it should be port assigned to CLI which should be 41002. In our example above we have inadvertently opened a Web Access Settings panel under the Administration port 41001 and will therefore display the default settings.
If you are under the correct port, normally 41002, press CTRL-R within the Web Access Settings window to force the browser to refresh the cache. If this is still an error, check the Virtel SYSLOG for any error messages.
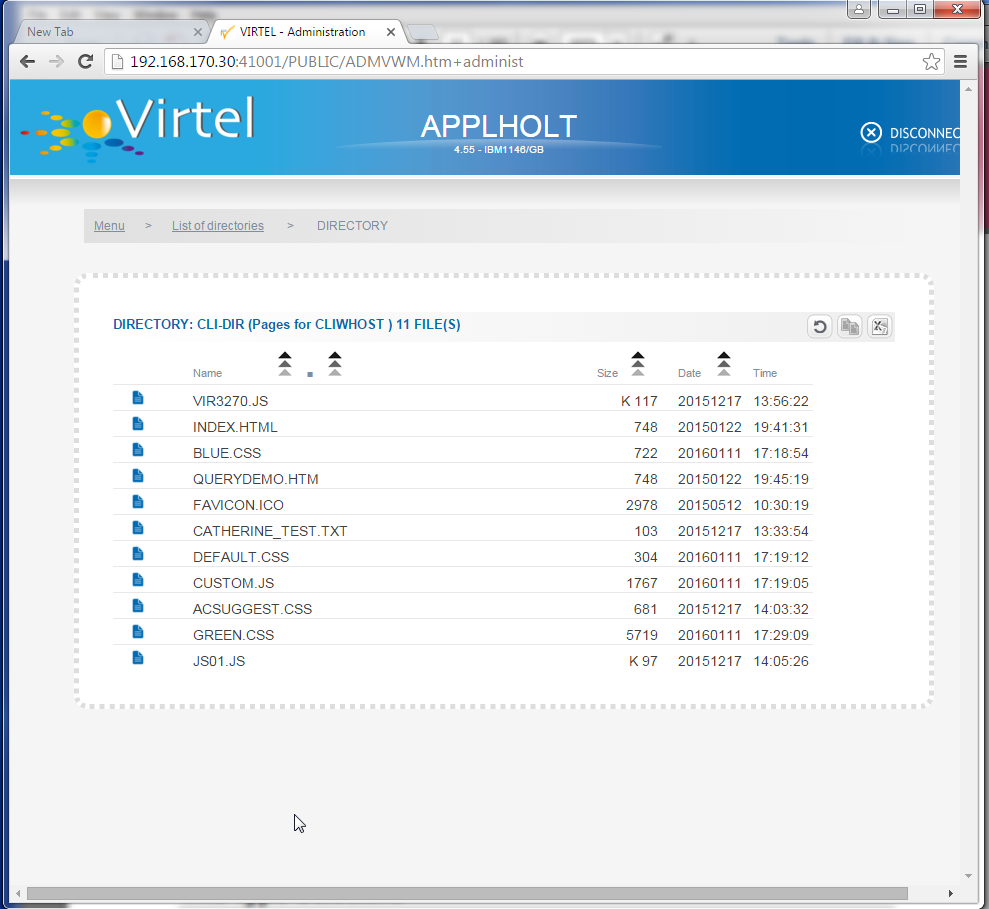
Use the Virtel Administration panel to list the CLI-DIR to ensure that your CSS and Java script files are there. The following shows a listing of the CLI-DIR files.
Also use the Administration panels to check that the transaction for locating custom.js is pointing to the CLI-DIR in the Application field:-
How do I get a copy of the source.zip file?
You can point your browser at 192.168.170.30:41001/w2h/sources.zip and that should automatically download sources.zip. After downloading extract the files to a suitable directory. All the HTML elements, including the CSS rules are located in this file.
How can I look at my customised files?
You can point your browser at 192.168.170.30:41002/w2h/custom-xx/custom.xx to view the files that you have uploaded. In this case xx would be either css or js depending on what files you wanted to view.
I have implemented method 2 but I am still picking up changes that I implemented in method 1.
Any changes found in a customised custom.css file will override other CSS rules. Remove the custom.css file from CLI-DIR and change the transaction CLI-03CC to point back to the W2H-DIR for locating custom.css.
These methods are OK but don’t given me the flexibility I need at a user level. I would have to have different directories to support different user requirements.
This is true for Virtel 4.53. Version 4.55 introduces changes at a transaction level which provides better functionality for customising web elements such as CSS rules.
Appendix A
Default 3270 style sheet WEB3270.CSS. Can be found within sources.zip. See Administration portal to download file.
/*
* VIRTEL Web Access 3270 style sheet
* (c)Copyright SysperTec Communication 2010 All Rights Reserved
* $Id: //depot/virtel/htmltools/w2h/WEB3270.css#18 $
*/
body, #classic {
   background-color: #000000;
   font-family: monospace;
   color: #00FF00;
   margin-top:1%;
   margin-bottom:1%;
}
a.hotspot, span.hotspot a {
   color: #FFFFFF;
   text-decoration: underline;
}
a.hotspot:hover, span.hotspot a:hover {
   background: #FFCC00;
   color: #000000;
   text-decoration: none;
}
a:hover, #classic a:hover {
   background: #ffcc00;
   color: #000000;
   text-decoration: none;
}
pre, #classic pre {
   background-color: #000000;
   color: #00FF00;
   font-family: monospace;
   margin:0;
   padding:0.5em 0 0 0;
}
input, #classic input {
   border: 0;
   font-family: monospace;
}
#printReady, #statusbar {
   text-align: center;
}
.NBLUE {color: #00CCFF;}
.NRED {color: red;}
.NPINK {color: pink;}
.NGREEN {color: #00FF00;}
.NTURQUOISE {color: #40E0D0;}
.NYELLOW {color: #FFFF33;}
.NWHITE {color: #FFFFFF;}
.NINVISIBLE {color: #000000;}
.SBLUE {color: #00CCFF; border-bottom: solid 1px;}
.SRED {color: red; border-bottom: solid 1px;}
.SPINK {color: pink; border-bottom: solid 1px;}
.SGREEN {color: #00FF00; border-bottom: solid 1px;}
.STURQUOISE {color: #40E0D0; border-bottom: solid 1px;}
.SYELLOW {color: #FFFF33; border-bottom: solid 1px;}
.SWHITE {color: #FFFFFF; border-bottom: solid 1px;}
.UBLUE {color: #00CCFF; text-decoration: underline;}
.URED {color: red; text-decoration: underline;}
.UPINK {color: pink; text-decoration: underline;}
.UGREEN {color: #00FF00; text-decoration: underline;}
.UTURQUOISE {color: #40E0D0; text-decoration: underline;}
.UYELLOW {color: #FFFF33; text-decoration: underline;}
.UWHITE {color: #FFFFFF; text-decoration: underline;}
.RBLUE {background-color: #00CCFF; color: #000000;}
.RRED {background-color: red; color: #000000;}
.RPINK {background-color: pink; color: #000000;}
.RGREEN {background-color: #00FF00; color: #000000;}
.RTURQUOISE {background-color: #40E0D0; color: #000000;}
.RYELLOW {background-color: #FFFF33; color: #000000;}
.RWHITE {background-color: #FFFFFF; color: #000000;}
.SMARTCURSOR_DEFAULT {text-decoration: underline; color: white;}
.SMARTCURSOR_RBLUE {text-decoration: underline; color: #000090;}
.SMARTCURSOR_RRED {text-decoration: underline; color: #FFFF60;}
.SMARTCURSOR_RPINK {text-decoration: underline; color: #600060;}
.SMARTCURSOR_RGREEN {text-decoration: underline; color: #005000;}
.SMARTCURSOR_RTURQUOISE {text-decoration: underline; color: #200080;}
.SMARTCURSOR_RYELLOW {text-decoration: underline; color: #B00000;}
.SMARTCURSOR_RWHITE {text-decoration: underline; color: black;}
@-webkit-keyframes fieldblinker {
   0% {}
   50% {opacity:0.0}
   100% {}
}
@keyframes fieldblinker {
   0% {opacity:1.0}
   50% {opacity:0.0}
   100% {opacity:1.0}
}
.BBLUE {
   color: #00CCFF;
-1px-webkit-animation: fieldblinker 1s steps(1,start) 0 infinite normal;
   animation: fieldblinker 1s steps(1,start) 0 infinite normal;
}
.BRED {
   color: red;
   -webkit-animation: fieldblinker 1s steps(1,start) 0 infinite normal;
   animation: fieldblinker 1s steps(1,start) 0 infinite normal;
}
.BPINK {
   color: pink;
   -webkit-animation: fieldblinker 1s steps(1,start) 0 infinite normal;
   animation: fieldblinker 1s steps(1,start) 0 infinite normal;
}
.BGREEN {
   color: #00FF00;
   -webkit-animation: fieldblinker 1s steps(1,start) 0 infinite normal;
   animation: fieldblinker 1s steps(1,start) 0 infinite normal;
}
.BTURQUOISE {
   color: #40E0D0;
   -webkit-animation: fieldblinker 1s steps(1,start) 0 infinite normal;
   animation: fieldblinker 1s steps(1,start) 0 infinite normal;
}
.BYELLOW {
   color: #FFFF33;
   -webkit-animation: fieldblinker 1s steps(1,start) 0 infinite normal;
   animation: fieldblinker 1s steps(1,start) 0 infinite normal;
}
.BWHITE {
   color: #FFFFFF;
   -webkit-animation: fieldblinker 1s steps(1,start) 0 infinite normal;
   animation: fieldblinker 1s steps(1,start) 0 infinite normal;
}
.NORMALMODECURSOR {border-bottom: solid 2px white; visibility: visible;}
.INSERTMODECURSOR {border-left: solid 1px white;margin-left:-1px; visibility: visible;}
.BLOCKCURSOR {color: black; background-color: white; visibility: visible;}
.SMARTCURSOR {border-bottom: solid 2px white; visibility: visible;}
@-webkit-keyframes cursorblinker {
   0% {background-color:white;color:black;}
   50% {background-color:white;color:black;}
   100% {background-color:inherit;color:inherit;}
}
@keyframes cursorblinker {
   0% {background-color:white;color:black;}
   50% {background-color:white;color:black;}
   100% {background-color:transparent;}
}
/* dirty hack to make it degrade gracefully on IE<9 */
:root *> .BLINKCURSOR {color: inherit;}
.BLINKCURSOR {
   -webkit-animation: cursorblinker 1s steps(1,start) infinite normal;
   animation: cursorblinker 1s steps(1,start) infinite normal;
   background-color:white;color:black;
}
.HIGHLIGHTED_INPUTFIELD {background-color:#2F4F4F;}
/* Styles for the color of the crosshair cursor lines */
#vLine {border-left-color:#F2F5A9;}
#hLine {border-top-color:#F2F5A9;}
.selection-box {
   border:1px solid red;
   background-color: rgba(128,0,255,0.1);
}