Protecting Virtel Applications with Shibboleth
This newsletter provides a summary of the configuration tasks involved in setting up a Shibboleth/Virtel SAML environment. It does not go through the Shibboleth IDP or SP installation in detail. The reader should research further for that information. It does, however, highlight the relevant files that had to be configured to get the interfaces to work within the context of an Single Sign On(SSO) solution.
Shibboleth is an “authentication” service, sometimes referred to as a federated identity management tool. It consists of two parts – a service provider (SP) and an identify provider (IDP). It also uses an LDAP server and Apache web servers to provide additional services. The communication protocol between the IDP, SP and other components is through SAML, a XML based language. The SP protects its supporting applications by authorising a user first before allowing access. It can protect its applications with a SSO facility. It builds a security context by communicating with the IDP to obtain attributes like userid (uid), common name (cun), surname (sun) and email address (mail).
Normally there is one local “home” identity provider which can be shared by many service providers. The security attributes are maintained in a LDAP server, with the IDP making requests to extract information on behave of the SP when validating users. The extracted information is return to the SP once the user has been validated. Validation can be through certificates or a simple userid and password.
The Virtel applications, as listed under the Virtel APPMENU transaction, are accessed through the protected URL https://sp.syspertec.com/Virtel which is defined to the SSO environment. A user accesses The SP for validation prior to being “passed” through to Virtel. Once a user has been validated by Shibboleth, the “pass through” will take place and the the Virtel APPMENU menu will appear listing the applications supported by Virtel. A user will select their application and will then be logged onto that application without further need to provide any userid or password. Virtel and Shibboleth use a SSO method for accessing Virtel applications. The UID from the LDAP, representing the USERID, is used in a special HTTP header - “SM_Header” which is passed to Virtel. Using a Virtel scenario, Virtel obtains a PASSTICKET and logs onto the application using the USERID and generated pass ticket to associate with the userid passed in the SM_HEADER. See the technical newsletter 2014/07 – Pass tickets and supporting Proxy Servers for further details on how to configure Virtel to use HTTP headers in support of an SSO environment.
Once a user has been validated the associated security context built by Shibboleth will remain within the browser’s cache so that access to any protected resource will be permitted using the same security attributes. This means that any secure application listed in the Virtel APPMENU transaction can be access without further signon validation. Each time a new application is selected a new passticket will be generated. This assumes that all user Virtel Applications within the APPMENU list have been set up to support PASSTICKETS.
Security between the SP and Virtel is over TLS/SSL session. To implement this secure session requires that Virtel is setup to interface with AT-TLS. See the Virtel document “How to activate VIRTEL https using AT-TLS” for further information on setting up the z/OS PAGENT configuration. The newsletter “2014/16 – Virtel TLS/SSL Security: Signing on using server and client certificates is also another good reference.
Note: In our Shibboleth testing we did not use client certificates when establishing a session with Virtel.
Flow overview
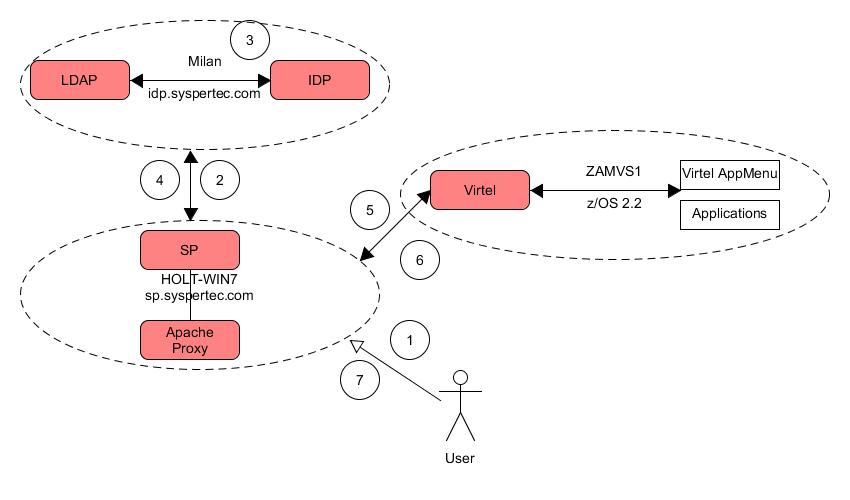
Fig.1 - Overview of logon sequence
User accesses Virtel entity through the protected URL https://sp.syspertec.com/Virtel
Service provider requests userid and password through logon template:-
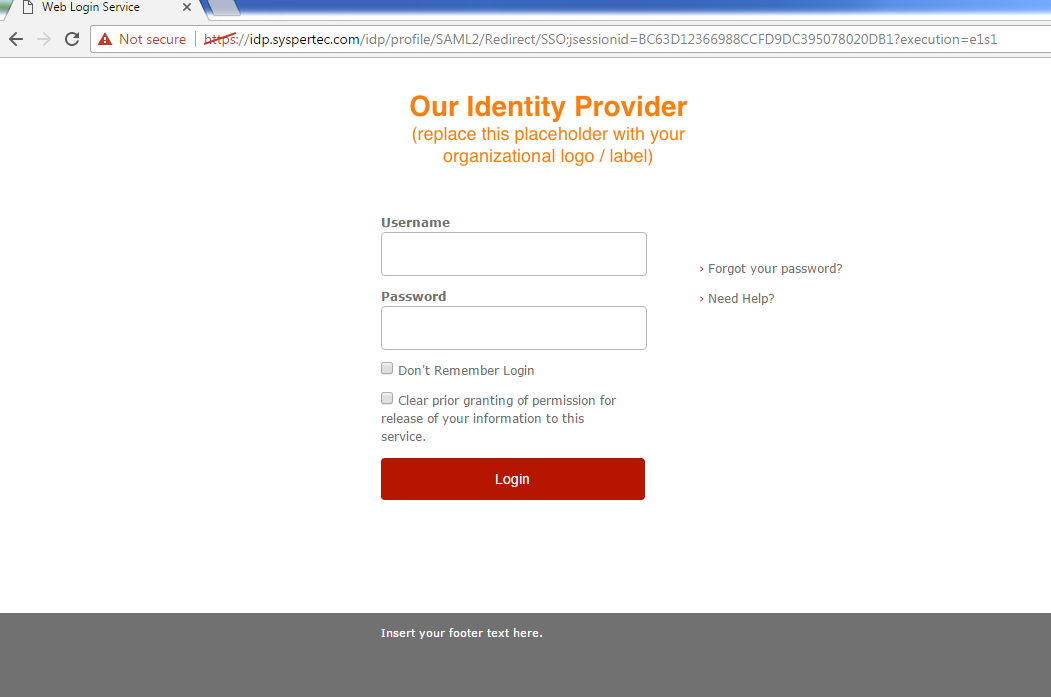
Fig.2 - Identity Provider logon
IDP validates user credentials against LDAP attributes.
IDP returns selected attributes to SP. In this case only the UID, representing the UID, is required.
SP redirects user to Virtel APPMENU transaction passing the UID information, the USERID, as a header in the HTTP request – SM_USER.
Virtel presents application menu.
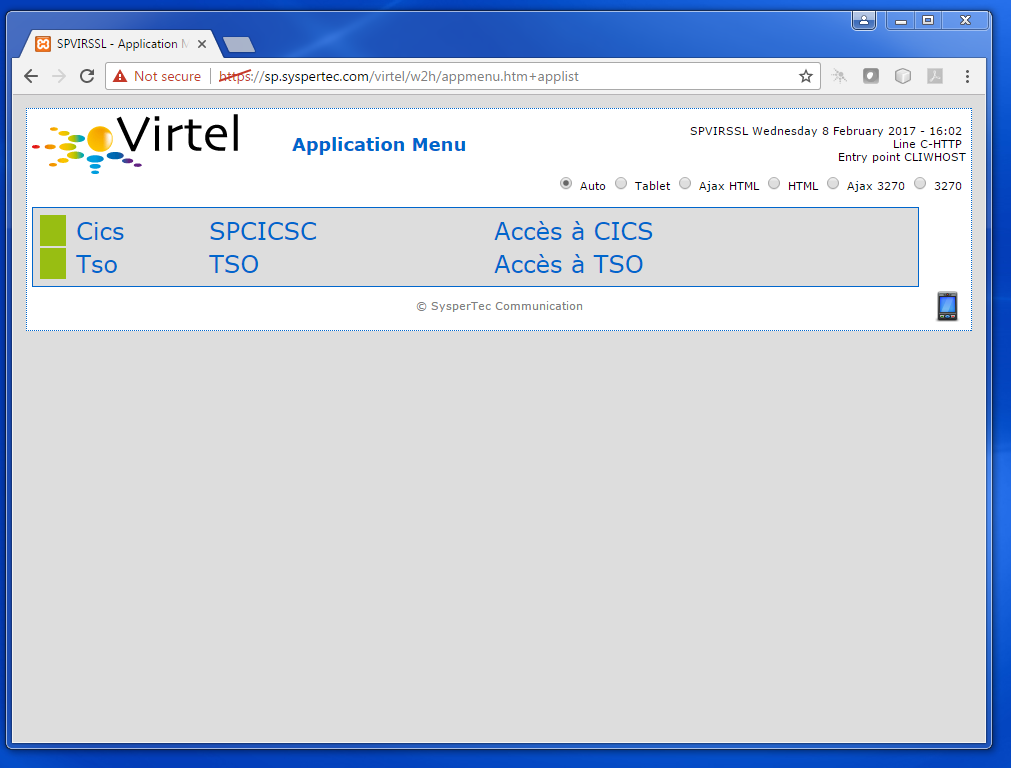
Fig.3 - Virtel application menu
User selects applications and logs on without specifying userid or password. Virtel uses the SM_USER header and generates a PASSTICKET to associate with the userid.
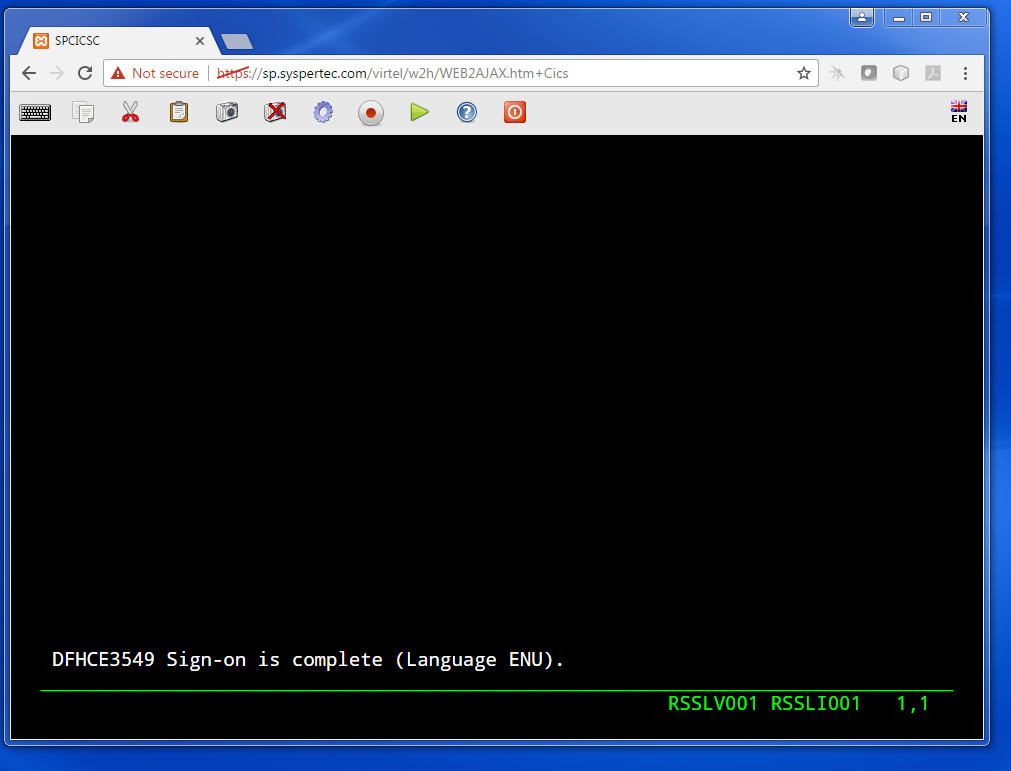
Fig.4 - User accesses application
Setting up the IDP environment
IDP Version 3
The Shibboleth IDP is a Java web application that runs within a Servet container - In our case we use Tomcat. Tomcat runs on the Milan server which is has an IP address of Milan is 192.168.92.190. Using V3 is problematic as most of the “user install” documentation refers to V2. There are a lot of differences! Here are the varibales and paths we use.
IDP         https://idp.syspertec.com/idp
IDP_HOME    /opt/shibboleth-idp
IDP Configuration files $IDP_HOME/conf
TOMCAT      http://idp.syspertec.com:8081     Tomcat Web Page
Web Manager Application admin/password
$TOMCAT-HOME /usr/share/tomcat
Tomcat Configuration files $TOMCAT\_HOME/conf
The IDP is enabled for SSL and has a keystore containing the necessary security credentials. The idea behind this is that traffic is secure on the login and any communication between the SP and IDP. The keystore is called idpself.keystore - the pass phrase is “VirtelIsGreat”.
The keystore was generated with the “keytool” program:-
# cd $TOMCAT-HOME
# mkdir credentials
# cd credentials
# keytool –genkey –alias tomcat –keyalg RSA –keystore idpself.keystore
This keystore is defined in the Tomcat server.xml file within the <connector> attribute. It defines a connector using port 8443. THIS IS NOT IN USE!
Authentication method.
The IDP authentication handler can authenticate a user by one of several authentication methods. The default Userid/Password authentication handler is used in our setup. Authentication flows are defined in $IDP_HOME/conf/authn.
See https://wiki.shibboleth.net/confluence/display/IDP30/AuthenticationConfiguration for further details.
The IDP Configuration maintained on the Milan Server:-
File= /opt/shibboleth-idp/conf/idp.properties
In this file we define the entity ID of our IDP server:-
# Set the entityID of the IdP
idp.entityID= https://idp.syspertec.com/idp/Shibboleth                    <<< Our IDP entity**
# Set the scope used in the attribute resolver for scoped attributes
idp.scope= syspertec.com
File = /opt/shibboleth-idp/attribute-filter.xml
In this file we configure what security attributes are passed to the SP. Within the <AttributeFilterPolicyGroup> the following filter policy was added:-
<!-- Release some attributes to an SP. -->
<AttributeFilterPolicy id="example1">
    <PolicyRequirementRule xsi:type="Requester"
    value="https://sp.syspertec.com/shibboleth" />
<AttributeRule attributeID="eduPersonPrincipalName">
<PermitValueRule xsi:type="ANY" />
</AttributeRule>
<AttributeRule attributeID="uid"> **<<< Required for HTTP HEADER**
<PermitValueRule xsi:type="ANY" />
</AttributeRule>
<AttributeRule attributeID="mail">
<PermitValueRule xsi:type="ANY" />
</AttributeRule>
</AttributeFilterPolicy>
File = Attribute-filter.xml
In this file we configure what security attributes are passed to the SP. Within the <AttributeFilterPolicyGroup> the following filter policy was added:-
File = /opt/shibboleth-idp/conf/ldap.properties
In this file we identify the LDAP server that the IDP will use. We also set the TLS security flag to true and identify the Java trustStore.
## Connection properties ##
idp.authn.LDAP.ldapURL = ldap://milan:10389 **<<< Our LDAP Server**
idp.authn.LDAP.useStartTLS = true
## SSL configuration, either jvmTrust, certificateTrust, or keyStoreTrust
idp.authn.LDAP.sslConfig = keyStoreTrust
idp.authn.LDAP.trustStore = %{idp.home}/credentials/milan.jks
File=/opt/shibboleth-idp/conf/metadata-providers.xml
In this file we identity the location of the metadata that represents our SP.
<MetadataProvider xsi:type="FilesystemMetadataProvider" id="SPMETADATA"
metadataFile="/opt/shibboleth-idp/metadata/sp-metadata.xml"/>
</MetadataProvider>
Setting up the Service Provider V2
Our SP Configuration is maintained on Windows workstation HOLT-WIN7
To support the SP environment we installed the latest XAMPP tool. This provides an Apache container from which we can use and configure Shibboleth SP V2. The Apache Server runs as a reverse proxy redirecting request towards Virtel. Here are some of the paths and variables setto support the Shibboleth SP.
SP                              sp.syspertec.com
SP_HOME (distribution)          C:\\opt\\shibboleth-sp
SP Configuration files          $SP\HOME\\etc
Apache Home Page                http://sp.syspertec.com
XAMPP                           C:\\xampp\\apache
Apache Configuration files      C:\\xampp\\apache\\conf
SP Configuration files          C:\\xampp\\apache\\conf\\extra
Note: After installing XAMPP and the Shibboleth V2 make sure that the Shibboleth Windows Service is running:-
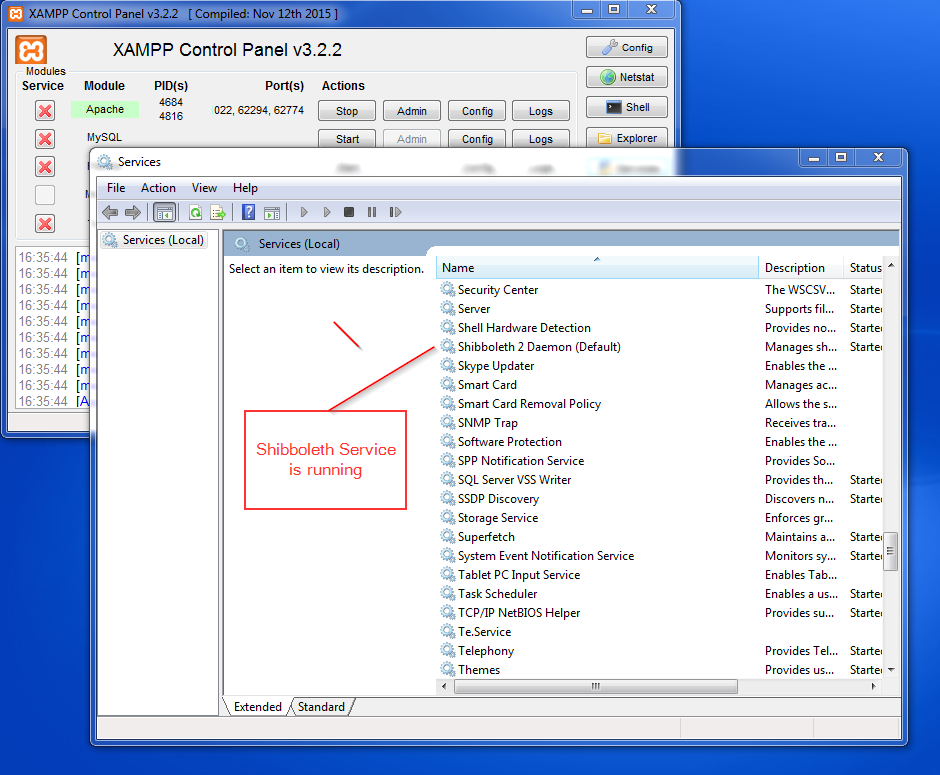
Fig. 5 - Shibboleth Window Service running.
Shibboleth Configuration
The files modified in the Shibboleth setup for the SP are as follows:-
File = C:\opt\shibboleth-sp\etc\Shibboleth2.xml
This is the main shibboleth configuration file. Here are some of the elements that were modified.
<ApplicationDefaults entityID=https://sp.syspertec.com/shibboleth                <<< Entity ID
      REMOTE_USER="uid eppn persistent-id targeted-id"                           <<< UID
      cipherSuites="ECDHE+AESGCM:ECDHE:!aNULL:!eNULL:!LOW:!EXPORT:!RC4:!SHA:!SSLv2">

...
<SSO entityID=https://idp.syspertec.com/idp/shibboleth                           <<< Entity ID**
       discoveryProtocol="SAMLDS"
       discoveryURL="https://ds.example.org/DS/WAYF">
          SAML2 SAML1
</SSO>
...

<CredentialResolver type="File"                                                  <<< Server Certificate**
     key="C:\\xampp\\apache\\conf\\ssl.key\\server.key"
     certificate="C:\\xampp\\apache\\conf\\ssl.crt\\server.crt" />

</ApplicationDefaults>
File = C:\opt\shibboleth-sp\etc\attribute-map.xml
The UID attribute was uncommented in the attribute-map.xml file.
-->
<Attribute name="urn:oid:0.9.2342.19200300.100.1.1" id="uid"/>
<!—
File = C:\opt\shibboleth-sp\etc\idp-metadata.XML
Metadata file for IDP
File = C:\opt\shibboleth-sp\etc\sp-metadata.XML
Metadata file for SP.
Apache Configuration
File =C:\XAMPP\Apache\Conf\httpd.conf
This is the standard Apache HTTP configuration file. In here we configure the protected resources and configure the Shibboleth SP. The following statements are added or modified:-
Set the Server name for the Apache Server:-
ServerName sp.syspertec.com:80
Set the required Proxy Modules:-
LoadModule proxy\_module modules/mod\_proxy.so
LoadModule proxy\_ajp\_module modules/mod\_proxy\_ajp.so
LoadModule proxy\_balancer\_module modules/mod\_proxy\_balancer.so
LoadModule proxy\_connect\_module modules/mod\_proxy\_connect.so
Set redirect on to support redirect request within Virtel HTTP responses:-
<IfModule alias\_module>
   #Send /w2h request to /xampp/htdocs/virtel
   Redirect /w2h /virtel/w2h                                 <<< Virtel Redirect
   ScriptAlias /cgi-bin/ "C:/xampp/cgi-bin/"
</IfModule>
Add the include for the Shibboleth HTTP configuration file:-
#Shibboleth
#include 'C:\\opt\\shibboleth-sp\\etc\\shibboleth\\apache24.config'
include "conf/extra/httpd-shibboleth.conf
File = C:\XAMPP\Apache\Conf\extra\httpd-shibboleth.conf
Within this file we add the location “Virtel” as a protected resource. Any access to the Virtel application we have to be validated through the IDP and SP interface. The SP will set the variable REMOTE_USER using the IUD attribute (USERID) as returned by the IDP on successful validation. This value will be passed through to Virtel in the SM_USER header and wll be used to generate a PASSTICKET. The userid /PASSTICKET combination will then be used to sign on to any secure applications definied within the Virtel APPMENU list.
# Connect using HTTPS to SPVIRSSL on ZAMVS2
<Location /virtel>
 AuthType shibboleth
 ShibRequestSetting requireSession 1
 require shib-session
 RequestHeader set SM_User %{REMOTE_USER}s                  <<< = Create HTTP header
 ProxyPass https://192.168.171.30:41002                     <<< = Secure Virtel Port
 ProxyPassReverse https://192.168.171.30:41002              <<< = Secure Virtel Port
</location>
#
LDAP
The LDAP environment that was used to support the Shibboleth IDP was the Apache Data Services LDAP offering. This was installed on the Milan Server. Configuration of the LDAP is through the Windows Apache Data Services client. This has to be installed on a Windows machine and then pointed at the LDAP Server.
Once configured correctly, the client can access the LDAP structures and build the necessary security credentials that the IDP will require.
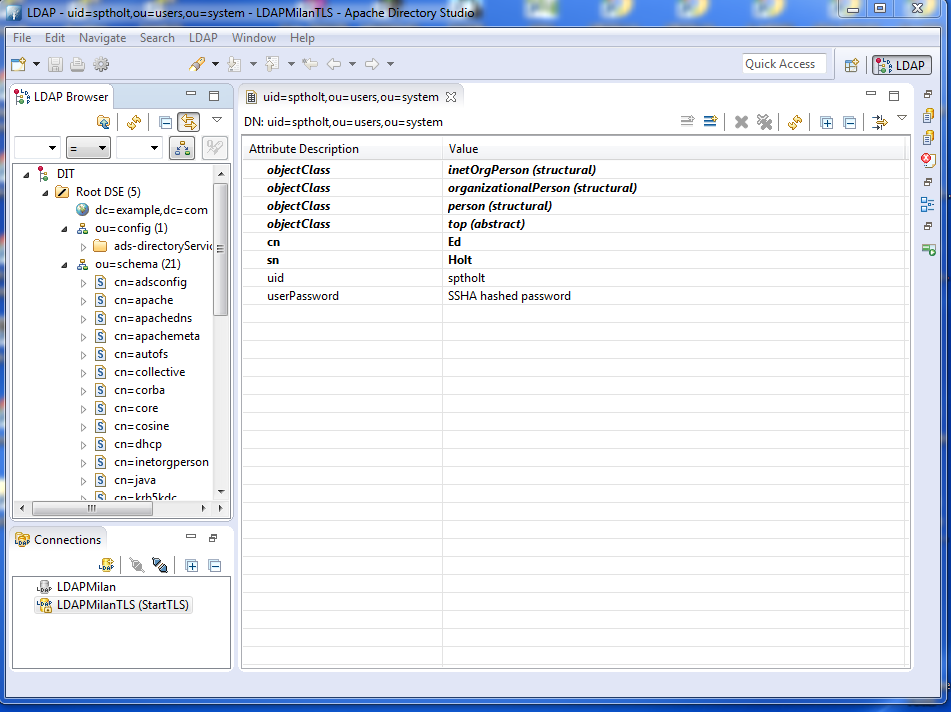
Fig. 6 - Example of the Apache DS Client